ApproachBuilders Blog
As a locally owned and operated business, we know that community is at the heart of everything we do -- and that there are many stories in the community worth sharing. Our Builder's Blog is a way for us to share that. From local events and up-and-coming communities to good, old fashioned-family recipes and home builder tips and trends that will take your home-ownership game to the next level!
Building Series: Step 2: Framing & Roofing
July 17, 2020
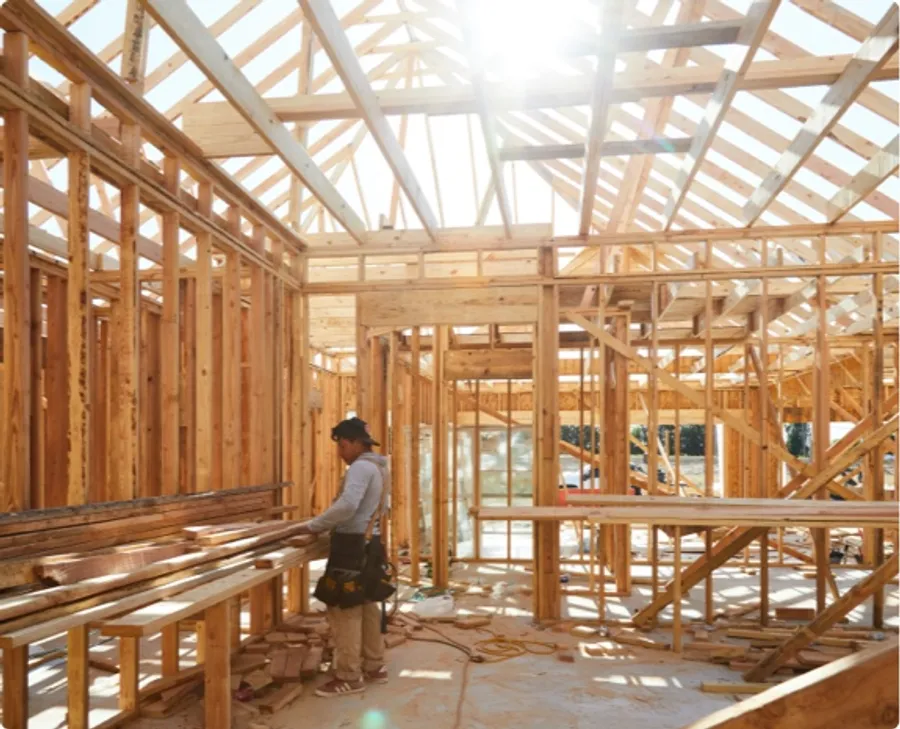
In the first video in our Building Series, we showed how each home site is prepped and foundation is laid. In this post, we will cover the framing process, which is essentially the wooden skeleton of the house. This stage stakes about a week to complete, and is very exciting for homeowners to watch as their new homes start to take shape!
First, the walls are framed with studs and wooden supports on top of the slab. Each stud is only 16 inches apart so that the wall is strong. These supports are braced from both sides of the wall so that it stays up while it’s being built. We will remove the bracing on the outside of the house once the walls are self-supporting, which requires the installation of the sheathing.
The sheathing is a collection of plywood sheets, which give structural integrity to the walls and keep the studs square. We attach four-foot by eight-foot sheets of plywood to the studs until the wall frames are covered, and then we are able to remove the exterior bracing. This means those exterior walls are now standing up on their own!
We leave the interior bracing up until the ceiling joists have been installed. These joists are the essential structural component of the ceiling, like the studs are for the walls. Once the ceiling joists are nailed to the top of the wall framing, it’s time to build the roof rafters.
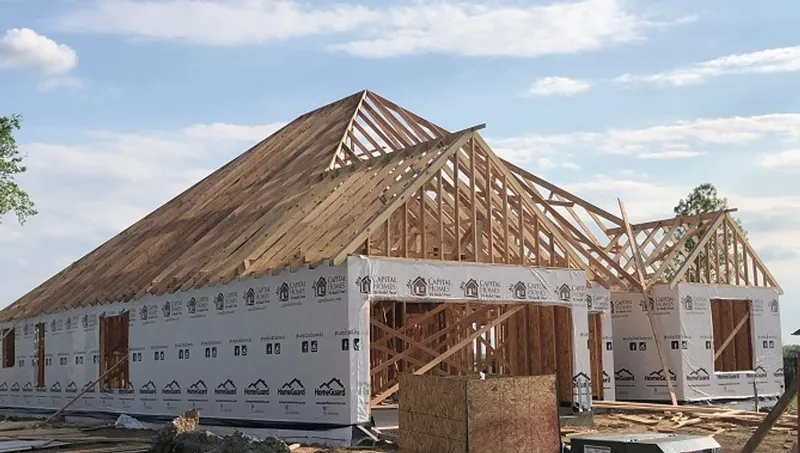
There is a ridge board in the middle of the roof where the rafters meet, and the rafters are also attached to the top of the exterior walls. (For small, single-story homes, we sometimes use a “truss roof,” which is a pre-constructed piece that is set on top of the wall frames and includes both the ceiling joists and rafters.)
Now we finish up framing the roof by installing the roof decking, which is plywood attached to the rafters. At this point in the construction process, the framing is essentially complete, and your house will look like a house! Then, we go inside the fully framed home to remove the rest of the bracing and finish up any detail work. Finally, the roofing company will come out and complete the roof with waterproofing and shingles.
Once these steps are complete, we can install the windows and put up the siding. The siding boards are nailed to the wall studs starting from the bottom, and each board will overlap the one below it in order to cover the nails and keep them waterproofed. Any parts of the exterior walls which are not covered with siding will be covered with brick.
At this point, homeowners will be able to really visualize their new home!
Latest Posts
December 15, 2025
Bringing Homes to Life: Meet Our Incredible In-House Design Consultants
December 8, 2025
Meet the Team That’s Building Dreams — Not Just Houses
December 1, 2025
Welcoming 2026: Find Your Next Home With Capital Homes This December
November 24, 2025
The Heart Behind Every Home: Our Capital Family
November 10, 2025
Welcome to Phase II at Elysian Fields – Where Your Dream Home Awaits
November 10, 2025
Why the Tacoma Floor Plan Continues to be a Customer Favorite
November 4, 2025
The Birch: Spacious, Smart, and Designed for Real Life
October 24, 2025
Start Fresh with Capital Homes’ Clean Slate Program
October 20, 2025
Playgrounds, Ponds, and Pups — Communities That Have It All
What Our
Homebuyers Are Saying

"It's our first time in a new home and we love how there is hardly any maintenance. If anything comes up, we feel at ease knowing we can call the warranty team. They are quick to answer and assist us with any questions. We love walking out our door and hanging out with our neighbors. It's such a lovely community of young families and retired couples. The perfect mix of life for us in this new chapter."